
How To Put Track Spikes In Shoe?
Introduction of this article:
Track and field athletes understand the crucial role that their footwear plays in their performance. One key component of this footwear is the track spike – small, sharp objects that are screwed into the bottom of track shoes to provide additional traction and speed. However, the process of installing these spikes can be a bit daunting for beginners. In this guide I will teach you how to put track spikes in shoe.
This article aims to demystify this process, providing a comprehensive guide on how to put track spikes in shoes. Whether you’re a seasoned athlete or a novice just starting out, understanding how to properly install and maintain your track spikes can significantly enhance your performance on the track. Let’s dive into the world of track spikes and learn how to install them correctly.
Understanding Track Spikes
Track spikes are small, pointed pieces of metal or ceramic that are screwed into the soles of track shoes. They are designed to increase traction and minimize slippage on the track, thereby enhancing an athlete’s performance. Here’s a deeper look into understanding track spikes:
Function of Track Spikes
The primary function of track spikes is to provide athletes with additional grip on the track surface, reducing the risk of slipping, especially during high-speed events. This increased traction allows athletes to run faster and more efficiently.
Types of Track Spikes
There are several types of track spikes, each designed for specific events or surfaces.
Spike Length
The length of the spike that an athlete chooses depends on the event and the track conditions. Sprinters on all-weather tracks typically use shorter spikes (1/8 to 3/16 inch), while distance runners or cross-country runners may use longer spikes (1/4 to 1/2 inch).
Spike Material
Spikes are typically made from steel, ceramic, or titanium. Each material has its own advantages and disadvantages in terms of weight, durability, and cost.
Related To: 5 Best Running Shoes For Men
Related To: Can Running Shoes Be Too Soft?
Choosing the Right Spikes for Track Shoes
Choosing the right spikes for your track shoes is a crucial step in ensuring optimal performance. Here are some factors to consider:

Type of Event
Different track events require different types of spikes. Sprinters typically use shorter spikes (1/8 to 1/4 inch) for better traction on hard surfaces, while distance runners may opt for slightly longer spikes (1/4 to 1/2 inch) for better grip on a variety of surfaces. Jumpers and throwers have their own specific spike requirements as well.
Spike Material
Track spikes are typically made from steel, ceramic, or titanium. Steel spikes are durable and inexpensive, but they can rust if not properly cared for. Ceramic spikes are lighter and won’t rust, but they’re more fragile. Titanium spikes are both lightweight and strong, but they’re also the most expensive.
Spike Configuration
The number and arrangement of spikes on a shoe can vary. Sprint shoes often have more spikes (up to 10) for maximum traction, while distance shoes may have fewer spikes (4-6) to reduce weight.
Shoe Compatibility
Not all spikes are compatible with all shoes. Always check the manufacturer’s recommendations for both the shoes and the spikes to ensure they’re compatible.
Personal Comfort
Ultimately, the best spikes are the ones that feel the most comfortable for you. Try different types and sizes of spikes to find the ones that work best for your feet and your running style.
Remember, the right spikes can make a significant difference in your performance. Take the time to choose wisely, and you’ll be well on your way to achieving your track and field goals.
Step-by-Step Guide to Installing Track Spikes
Installing track spikes in your shoes is a straightforward process. Here is a step-by-step guide to help you:

Gather the necessary tools
You will need a spike wrench and the appropriate spikes for your shoes. Spike wrenches are usually provided with the spikes or can be purchased separately.
Clean and inspect the spike holes
Ensure that the spike holes on the sole of your shoes are clean and free from any debris or dirt. Use a small brush or cloth to clean them thoroughly. Inspect the holes for any damage or obstructions that may hinder the installation of the spikes.
Choose the right size and type of spikes
Select the appropriate spikes based on the type of event, track surface, and personal preference. Refer to the manufacturer’s guidelines or consult with experienced athletes or coaches for recommendations.
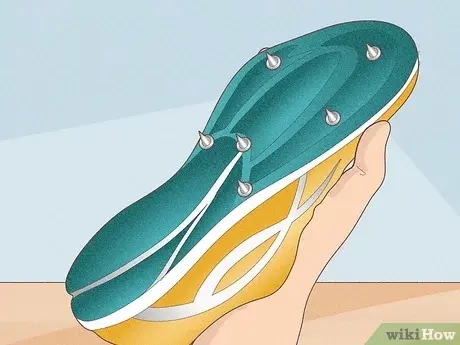
Insert the spikes into the holes
Take one spike and align it with a hole on the shoe sole. Gently push the spike into the hole, making sure it goes in straight. Apply even pressure until the spike is fully inserted.
Tighten the spikes using the spike wrench
Once the spike is inserted, use the spike wrench to tighten it securely. Hold the spike wrench firmly and turn it clockwise to tighten the spike. Be careful not to overtighten, as it may damage the shoe or the spike.
Repeat the process for all spikes
Repeat steps 4 and 5 for each spike, ensuring that they are evenly distributed across the sole of the shoe. Follow the recommended spike pattern for your specific event if applicable.
Check the spikes for proper installation
After installing all the spikes, give them a gentle tug to ensure they are securely in place. They should not move or come loose easily. If any spikes feel loose, use the spike wrench to tighten them further.
Tips for Properly Installing Spikes in Track Shoes
When it comes to properly installing spikes in your track shoes, here are some helpful tips to ensure a secure and effective installation:

Clean and prepare the spike holes
Before inserting the spikes, make sure the spike holes on the sole of your shoes are clean and free from any debris or dirt. Use a small brush or cloth to remove any obstructions that may hinder the installation process.
Use the right size and type of spikes
Choose spikes that are appropriate for your event, track surface, and personal preference. Refer to the manufacturer’s guidelines or seek advice from experienced athletes or coaches to select the optimal spike length and type.
Insert the spikes straight and evenly
When inserting the spikes, make sure to align them with the holes and insert them straight. Avoid applying excessive force or angling the spikes, as this can cause damage to the shoe or the spike itself. Additionally, distribute the spikes evenly across the sole of the shoe for balanced traction.
Use a spike wrench for proper tightening
A spike wrench is designed to securely tighten the spikes. Utilize the spike wrench provided with the spikes or purchase one separately. Hold the spike wrench firmly and turn it clockwise to tighten the spikes. Be cautious not to overtighten, as this can strip the threads or damage the shoe.
Check for secure installation
After installing the spikes, give them a gentle tug to ensure they are securely in place. They should not move or come loose easily. If any spikes feel loose, use the spike wrench to tighten them further.
Regularly inspect and maintain your spikes
Periodically check the tightness of your spikes and inspect them for any signs of wear or damage. Replace worn-out or damaged spikes promptly to maintain optimal performance and safety.
Maintaining and Replacing Spikes in Track Shoes
Maintaining and replacing spikes in your track shoes is essential to ensure optimal performance and safety. Here are some tips for maintaining and replacing spikes:
Regularly inspect your spikes
Check your spikes before and after each use to ensure they are securely in place and in good condition. Look for any signs of wear, damage, or looseness. If you notice any issues, address them promptly.
Clean your spikes
After each use, clean your spikes to remove dirt, debris, and moisture. Use a brush or cloth to gently clean the spikes and the spike holes. This helps prevent rusting and ensures proper functionality.
Avoid overtightening
While it’s important to ensure that your spikes are securely tightened, be cautious not to overtighten them. Over-tightening can strip the threads or damage the shoe. Use a spike wrench and apply firm, but controlled, pressure to tighten the spikes.
Replace worn-out or damaged spikes
Over time, spikes can wear down or become damaged, compromising their effectiveness. Inspect your spikes regularly and replace them when they show signs of significant wear, such as blunt or flattened tips. Additionally, if any spikes are damage or broken, replace them immediately.
Follow manufacturer recommendations
Different shoe models and spike types may have specific guidelines for maintenance and replacement. Refer to the manufacturer’s instructions or consult with experienced athletes or coaches to ensure you are following the recommended practices.
Keep spare spikes on hand
It’s a good idea to have spare spikes available in case of emergencies or when replacements are needed. This ensures that you can quickly replace worn-out or damaged spikes without interrupting your training or competition.
Conclusion
In conclusion, knowing how to properly install track spikes in your shoes is essential for maximizing your performance on the track. By following the step-by-step guide, you can ensure a secure and effective installation. Remember to choose the right size and type of spikes for your event and track conditions, clean and inspect your spikes regularly, and replace worn-out or damaged spikes promptly.