
How To Add Shoes To Strava? Very Easy Guidance
Welcome to our easy-to-follow guide on adding shoes to your Strava profile. Strava is a popular platform for tracking athletic activities, and adding your shoes to your profile is essential for accurate tracking and analysis. In this blogpost, we will walk you through the process step-by-step, ensuring that you can make the most of your Strava experience.
Strava allows you to monitor your athletic performance, set goals, and analyze your progress over time. By adding your shoes to your profile, you can keep track of the mileage you’ve covered and gain valuable insights into your training routine. So, let’s get started and learn how to add your shoes to Strava effortlessly.
Why Add Your Shoes To Strava?
Adding your shoes to Strava offers several benefits that can enhance your tracking experience. By accurately tracking the mileage you’ve covered during your activities, you can monitor your progress, set goals, and stay on track with your training plan. Additionally, analyzing the performance of your shoes over time can help you determine when it’s time to replace them, preventing potential injuries and maintaining optimal performance. Tracking shoe mileage also allows you to identify patterns and potential causes of injuries, helping you make informed decisions and reduce the risk of overuse injuries.
Moreover, knowing the mileage on your shoes helps you optimize your training sessions, adjust intensity, and set realistic goals. Lastly, adding your shoes to Strava allows you to engage with a community of athletes, compare shoe usage, and gain insights into popular shoe choices. Don’t miss out on these benefits—add your shoes to Strava and take your fitness journey to the next level.
Add Shoes To Strava
Sure! Here’s a step-by-step method to add shoes to your Strava profile on:
Open Strava Website
Launch your preferred web browser and go to the Strava website (www.strava.com).
Sign In
If you’re not already signed in, click on the “Sign In” button at the top right corner of the page and enter your Strava account credentials to log in.
Access Your Profile
Once you’re signed in, click on your profile picture or username at the top right corner of the page. This will take you to your Strava profile.
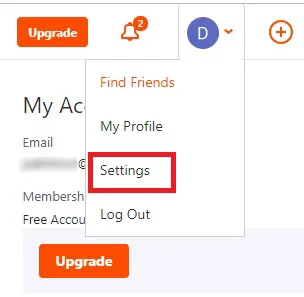
Go to Gear
On your profile page, look for the “Gear” tab located below your profile picture. Click on it to access the gear management section.
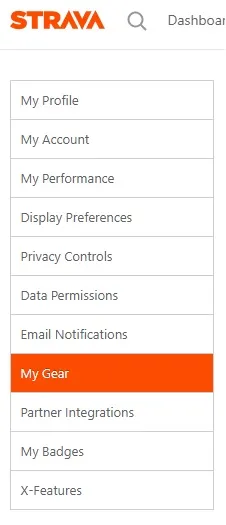
Add New Shoes
In the gear management section, you’ll find an option to add new shoes. Click on it, and a form will appear where you can enter the details of your shoes.
Enter Shoe Details
Fill in the required information, such as the shoe brand, model, and purchase date. You can also add additional details like the color or any notes you want to include.

Save the Shoe
Once you’ve entered all the necessary information, click on the “Save” or “Add” button to save the shoe to your Strava profile.
Edit or Delete Shoes
If you need to edit or delete a shoe entry in the future, you can go back to the gear management section, find the specific shoe, and make the necessary changes or delete it from your profile.
Related To: Best Running Shoes For Marathon
Related To: Best Running Shoes For Ankle Support: 10 Genuine Picks
Keeping Track of Your Shoes
When using Strava to track your athletic activities, it’s important to keep track of your shoes. By monitoring your shoe usage, you can optimize your training, prevent injuries, and make informed decisions about when to replace your shoes. In this article, we’ll explore the significance of keeping track of your shoes on Strava and how it can enhance your overall fitness journey.
Accurate Mileage Tracking
Adding your shoes to Strava allows you to accurately track the distance you’ve covered during your activities. This helps you monitor your progress, set goals, and stay on track with your training plan.
Shoe Performance Analysis
Strava enables you to analyze the performance of your shoes over time. By tracking the mileage on each pair, you can determine when it’s time to replace them, ensuring optimal performance and reducing the risk of injuries.
Injury Prevention
Regularly tracking your shoe mileage on Strava helps you identify patterns and potential causes of injuries. By monitoring wear and tear, you can make informed decisions about replacing your shoes and minimize the risk of overuse injuries.
Training Optimization
Knowing the mileage on your shoes allows you to optimize your training sessions. By understanding how much distance you’ve covered with each pair, you can adjust intensity, set realistic goals, and maximize the effectiveness of your workouts.
Community Engagement
Adding your shoes to Strava connects you with a community of athletes. You can compare shoe usage, share experiences, and gain insights into popular shoe choices among fellow athletes.
Can I Add Shoes from Mobile App?
Yes, you can add shoes to your Strava profile from the mobile app. Just open the app, access your profile, and go to the “Gear” section. There, you can add new shoes by entering the necessary details. It’s quick and convenient for tracking your shoe mileage on the go.
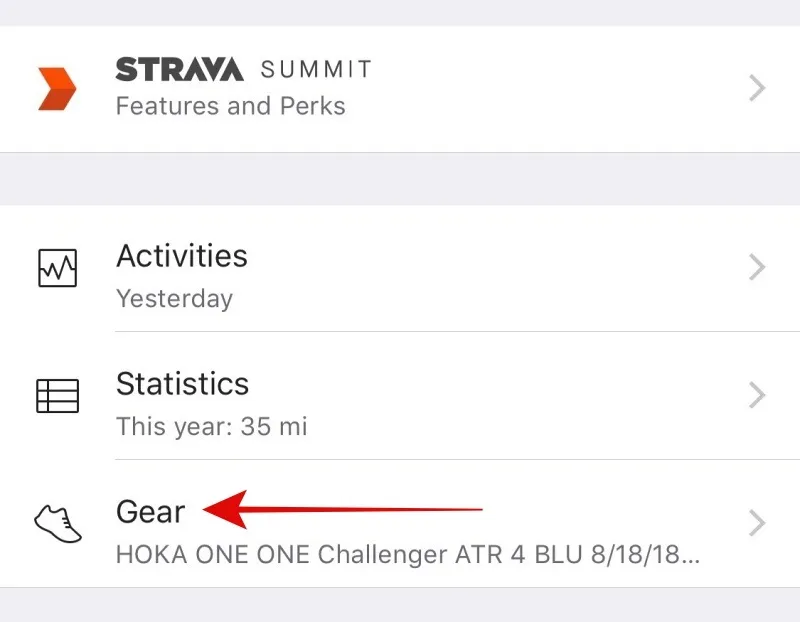
How to add track shoes from Mobile App
Yes, you can add shoes to your Strava profile directly from the mobile app. Here’s how you can do it:
Open the Strava App
Launch the Strava app on your mobile device.

Access Your Profile
Tap on the “Profile” icon located at the bottom right corner of the screen. This will take you to your Strava profile page.
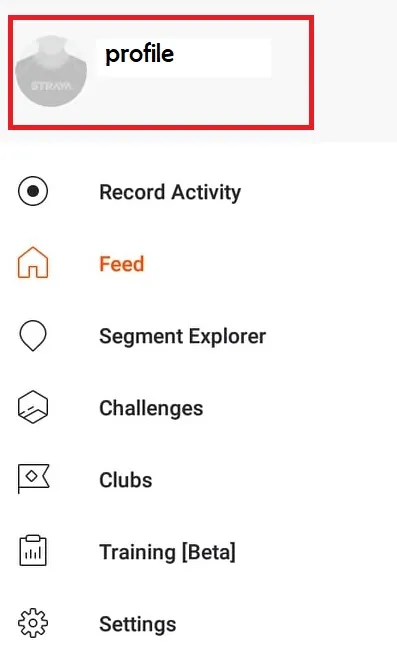
Navigate to Gear
On your profile page, look for the “Gear” section and tap on it. This section allows you to manage your gear, including adding and editing shoes.
Add New Shoe
In the Gear section, you’ll find an option to add new shoes. Tap on it, and you’ll be prompted to enter the details of your shoes.
Enter Shoe Details
Fill in the required information, such as the shoe brand, model, and purchase date. You can also add additional details like the color or any notes you want to include.
Save the Shoe
Once you’ve entered all the necessary information, tap on the “Save” or “Add” button to save the shoe to your Strava profile.

That’s it! You have successfully added your shoes to your Strava profile using the mobile app. Now, whenever you track an activity using Strava, you can select the shoes you wore, and Strava will keep track of the mileage and other relevant data associated with those shoes.
Conclusion
In conclusion, adding your shoes to Strava is a simple and important step to enhance your tracking experience. By accurately tracking the mileage of your shoes, you can monitor your progress, set goals, and optimize your training routine. Strava also allows you to analyze the performance of your shoes over time, helping you make informed decisions about when to replace them. Additionally, tracking your shoe mileage can aid in injury prevention by identifying patterns and potential causes of injuries. By adding your shoes to Strava, you can engage with a community of athletes, compare shoe usage, and gain insights into popular shoe choices. So, don’t forget to add your shoes to Strava and make the most of your fitness journey.
Frequently Asked Question

Author
Hi, I’m Mr. Tiger! CEO of specialshoes.net and have 30 years of experience in the Sports Shoe industry. This scientific and vast experience equipped me with the knowledge and understanding to assist you in finding the perfect pair of shoes for your specific sports and individual needs. I always stay, up-to-date with the latest trends and advancements in sports footwear technology, ensuring that my recommendations are always relevant and reliable. Thanks for visiting my site. I hope you enjoy the resources.